Introduction to path planning: made easier with Biicode
Contents:
Along this tutorial, I will show you how to execute my Fast Marching Method code uploaded to Biicode. You will realize how easy is to use this tool.
Theoretical background
The path planning algorithms employed in this section are the Fast Marching Method and the Fast Marching Square method. Those methods are really similar to Dijkstra's method: From a given point, the distance of all the surrounding points is computed incrementally. Somehow, it is like if we are propagating a wave from the start point. This wave explores the whole map until the goal point is found. This process creates a distances map which says "how far" every point is from the start point. Then, if we apply gradient descent method from the goal point, we will reach the start point following the minimum-distance path.
Fast Marching Square substitutes the term distance by arrival time. In this case, the wave does not propagate at constant velocity. It propagates slower as it gets close to obstacles. At the end, the distances map obtained is very similar. However, when gradient descent is run, the path obtained is safer (it does not get close to obstacles) and smoother. These are desirable properties when applied to robotics.
If you interested in deeply understand the algorithms, take a look at my Research section.
The underlying Fast Marching code relies on a rather complex nDGridMap class: A datastructure representing a n dimensional grid map.
Requirements
-
Download and install Biicode.
-
Boost 1.54 (probably previous versions would work as well) should be installed in the default directory.
-
Although it is provided by default with Ubuntu, libx11-dev should be installed in order to use CImg dependency (automatically managed by Biicode).
-
Be sure you have a C++11-compliant compiler. In my case, I am using g++ 4.8.2.
- Note
- The code provided lacks most of the error checkings(loading a wrong/inexistent file, clicking in obstacles, etc) since I aimed to keep it simple and readable.
- Note
- This tutorial is written to work in Ubuntu. The Fast Marching code has not been tested in other platforms, although I think it should work in other OS.
Are you in a hurry? Try this:
$ mkdir fmtutorial
$ cd fmtutorial
$ bii init
$ bii open jvgomez/fmexamples
$ bii cpp:build
$ ./bin/jvgomez_fmexamples_main
Click in any two white points of the map. In my case I clicked in the red circles (first start at top-left, then goal at bottom-right):
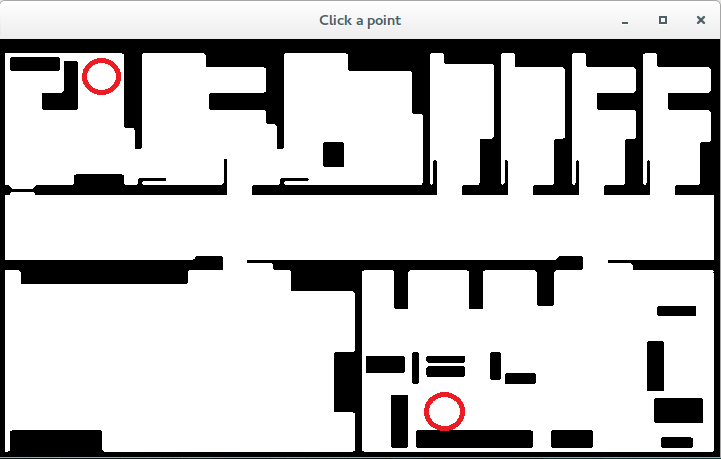
Input map used in the example with the start and goal regions marked as red circles.
Then, Fast Marching Method will run and you will see 2 outputs:
-
First, the distances map. It computes the minimum Euclidean distance from any point on the map to the start point, while avoiding obstacles (note how cool it is, you can do zoom, just select an area with the mouse, and double click to undo zoom).
-
Second (close the previous window to continue with the program), the final path obtained when gradient descent is applied from the given start point.
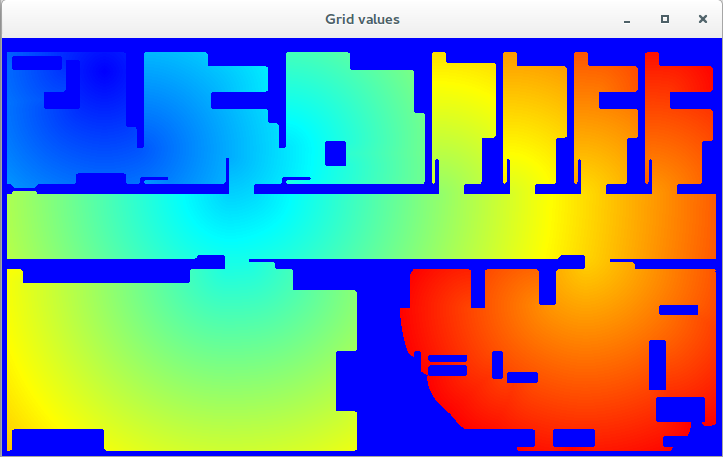
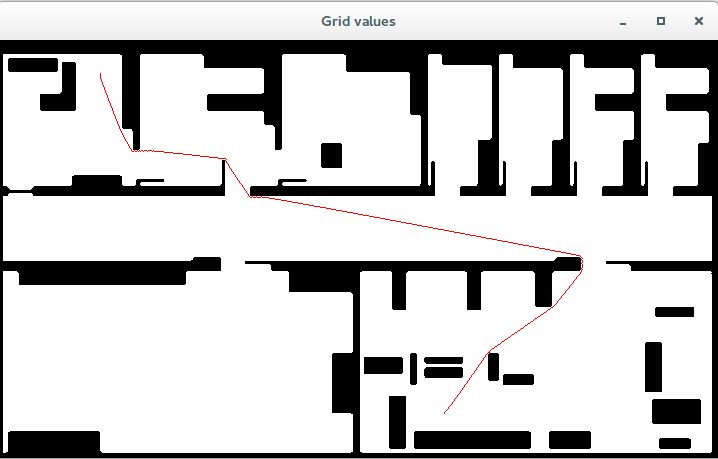
Left - FMM distances map. Right - Path obtained running gradient descent.
And my console output was the following:
jabuntu14@ubuntu:~/bii_ws/fmtutorial$ ./bin/jvgomez_fmexamples_main
[INFO] Click in the initial and goal points.
[INFO] Testing Fast Marching Method.
    Elapsed FMM time: 124 ms
[INFO] Plotting the results: Fast Marching distances map and path.
Congratulations! You just created, configured, compiled and run a path planning algorithm. With any other library this could have taken hours even if you are experienced.
Let's take a look at what happened

Biicode folder directory tree.
Actually, a lot of things happened that made our work much easier! Take a look at the file tree automatically generated in our fmtutorial folder (right thumbnail picture).
You can see the example code here.
With the set of commands give above we:
-
Set a Biicode project folder (bii init)
-
Get the Biicode block jvgomez/fmexamples (bii open jvgomez/fmexamples)
-
Automatically get all the required dependencies, configure the CMake project and compile it. We actually have very few dependencies:
#include "jvgomez/fmm/fmm/fastmarching.hpp" // Fast Marching
#include "jvgomez/fmm/io/maploader.hpp"     // Load map from image
#include "jvgomez/fmm/io/gridplotter.hpp"   // Plot map
#include "jvgomez/fmm/io/gridpoints.hpp"    // Enable point selection by clicking
#include "jvgomez/fmm/gradientdescent/gradientdescent.hpp" // Gradient descent
However, these files recursively have some other dependencies: CImg and other jvgomez blocks. Biicode manages all that automatically so all dependencies are obtained and the CMake project is successfully created.
A very important point is that you did not specify the compilation flags (such as C++11) or the dependencies to X11 required by CImg. Those were already included in the jvgomez/fmexamples block, but they are automatically downloaded when you opened the block. Isn't that awesome?
That is cool, but I want more!
OK, OK. Let us now modify the code so we can use the Fast Marching Square algorithm, available in the endher/fm2 block. For that, go to blocks/jvgomez/fmexamples/ , open
with your favourite editor the main.cpp file and carry out the following modifications:
- Deactivate FastMarching algorithm: comment lines 22, 58, 62, 64.
- Activate FastMarching2 algorithm: uncomment lines 23, 59, 63, 64.
And then, with a terminal open in the fmtutorial folder (as before), type the following commands:
$ bii find
$ bii cpp:build
$ ./bin/jvgomez_fmexamples_main
Et voilá! You have now the Fast Marching Square algorithm running and Biicode managed the dependenies for you (since a new block is required). The new path should look something like:
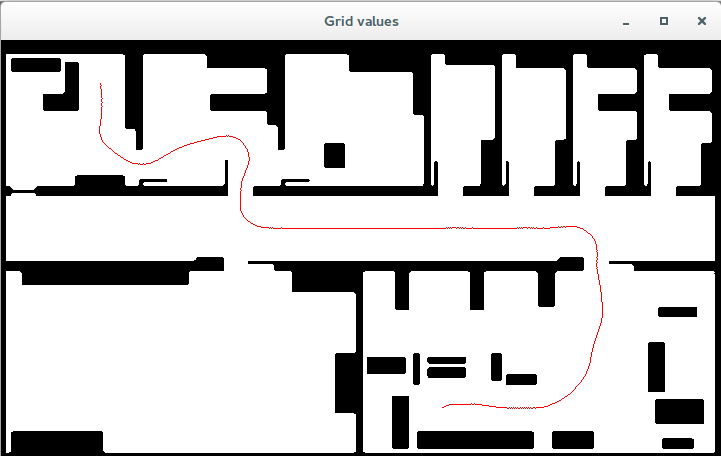
Fast Marching Square resulting path. Dependencies were automatically managed by Biicode
OK, you convinced me. Explain the code!
The Fast Marching code used implements a generalized, n-dimensional Fast Marching Method (and many different versions) using as main datastructure a n-dimensional gridmap (class nDGridMap). The code has been designed to that most of the complexity relies on the nDGridMap class. Therefore the Fast Marching algorithm is implemented in a way that it is completely independent of nDGridMap, so no dimensionality has to be taken into account.
In order to achieve this, together with a near-optimum performance, I used a policies-based design and a static-polymorphism approach. Most of the classes are templated: every FastMarching algorithm requires a grid type to work and a heap type (default is provided). For example, there are many different types of heaps, and changing the type given to the FastMarching class instance greatly affects in its performance, while the FastMarching code is exactly the same. Also, it does not mind if you are using a 2D grid, 3D grid, with FMCells (class used to represent each cell of the gridmap used together with FastMarching) or any other kind of cells or gridmap, as long as a minimum interface (set of class methods) is satisfied.
Therefore, the main code blocks are the following:
-
First, we declare the constant ndims and some other additional variables.
constexpr int ndims = 2; // Setting two dimensions.
time_point<std::chrono::system_clock> start, end;
double time_elapsed;`
-
We set the path the the file to open (hardcoded in this case). We also create a
nDGridMapinstance. Note that two policies (template parameters) are required: which kind of cells is the gridmap going to hold and how many dimensions. However, we do not know yet the size of each dimension. That depends on the map to be loaded, so we use theMapLoaderstatic class to parse the map (binary image file) into a 2DnDGridMap.fm2_sourcesis an auxiliar variable useful only for Fast Marching Square. It keeps those indices in the map which are obstacles.// Loading map and saving it into a grid. string filename("blocks/jvgomez/fmexamples/data/map.png"); nDGridMap<FMCell, ndims> grid; vector<int> fm2_sources; MapLoader::loadMapFromImg(filename.c_str(), grid, fm2_sources);
-
Next, we want to introduce by clicking the start and goal points and we use the cool
consolestatic class to give nice console output. Since we know the dimensions of the map (2) we can usestd::arraysto store the coordiantes of the initial and goal points.coords_initwill be an array [x_init, y_init] andcoords_goal[x_goal, y_goal]. Finally,GridPointsclass is used: it plots the map and ask for the points to the user.// Selecting initial and goal point. console::info("Click in the initial and goal points."); std::array<int, ndims> coords_init, coords_goal; GridPoints::selectMapPoints(grid, coords_init, coords_goal);
-
Before proceeding with the
FastMarchingalgorithm, we first need to convert from coordinates to indices. The n-dimensional grid is actually a 1D vector so its cells have to be handled through indicies. Fortunatelly, thenDGridMapclass contains thecoord2idx()method which takes care of that for us:vector<int> init_points; int idx, goal; grid.coord2idx(coords_init, idx); init_points.push_back(idx); grid.coord2idx(coords_goal, goal);
-
Now we can set the
FastMarchinginstance! We create aFastMarchingobject with the kind of grid as policy. We then set the specific grid object, the initial and goal points (indices) and then we are ready to callcomputeFM()!. Some additional code is included to measure the elapsed time in the computation:FastMarching< nDGridMap<FMCell, ndims> > fmm; fmm.setEnvironment(&grid); start = system_clock::now(); fmm.setInitialAndGoalPoints(init_points, goal); fmm.computeFM(); end = system_clock::now(); time_elapsed = duration_cast<milliseconds>(end-start).count(); cout << "\tElapsed FMM time: " << time_elapsed << " ms" << endl;
-
We also want to get the path, so the
GradientDescentclass is called.Pathtypename is actually a vector of 2D arrays, something like [x1 y1; x2 y2; x3 y3...] containing the path points.path_velocitystores the velocities profile for the given path (something out of focus for this tutorial). Again the type ofnDGridMapis given as template parameter soGradientDescentknows how to do its work. Finally, theapply()method is called from the goal point:typedef typename std::vector< std::array<double, ndims> > Path; Path path; std::vector <double> path_velocity; // Velocities profile GradientDescent< nDGridMap<FMCell, ndims> > grad; grad.apply(grid,goal,path,path_velocity);
-
Finally, let us make it beautiful and plot some results using the
GridPlotterclass:console::info("Plotting the results: Fast Marching distances map and path."); GridPlotter::plotArrivalTimes(grid); GridPlotter::plotMapPath(grid,path);
- Note
- If you are thinking this is a complex design since template parameters are also templated... believe me, it is quite easy.
Take a look at these other examples. In this case, the gridmap type has been renamed so a specific type of gridmap looks like an independent class. Instead of using nDGridMap<FMCell, 2>, we can just say FMGrid2D by the corresponding typedef:
typedef nDGridMap<FMCell, ndims2> FMGrid2D;
So the calls can be simplified:
FastMarching< nDGridMap<FMCell, ndims> > fmm; ---> FastMarching< FMGrid2D > fmm;
Contact
Any problem with this tutorial? Questions? Contact me!.